What you’ll learn
- 1Explain how a capacitive soil moisture sensor works and why it does not corrode.
- 2Explain what a relay is and why it is needed to switch a pump.
- 3Use threshold logic to make automatic decisions in code.
- 4Control an actuator manually from Processing and automatically from Arduino.
- 5Improve a control system with hysteresis to prevent rapid on/off switching.
- Capacitive sensor
- Measures how well the soil stores electric charge (permittivity) — water changes this a lot.
- Permittivity
- How strongly a material responds to an electric field. Water ≈ 80, dry soil ≈ 4.
- Relay
- An electrically operated switch: a small signal from Arduino switches a separate, more powerful circuit.
- Active-LOW
- A module that switches ON when its input is LOW (common for relay boards).
- Threshold
- A limit value at which the system changes its decision.
- Hysteresis
- Using two thresholds (switch on at one, off at another) so the system does not flicker.
- Closed loop
- A system that measures the result of its own action and corrects itself.
Required equipment
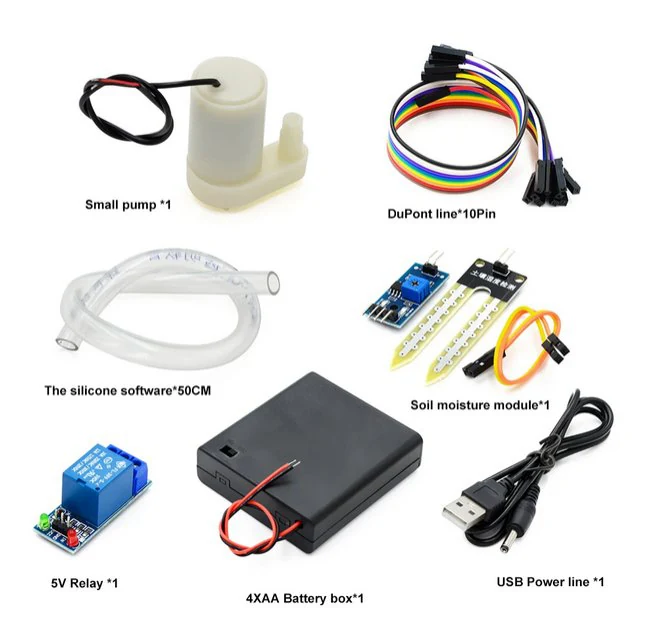
| Component | Qty | Purpose |
|---|---|---|
| Arduino Uno | 1 | Microcontroller |
| Capacitive soil moisture sensor v1.2 | 1 | Soil moisture measurement |
| Relay module (5 V) | 1 | Pump switching |
| Small submersible water pump (3–6 V) | 1 | Watering |
| Battery box / external supply matching the pump | 1 | Power for the pump |
| Silicone hose (50 cm) | 1 | Water delivery |
| Breadboard + jumper wires | 1 set | Component connection |
| USB cable + Processing IDE | 1 | Connection & visualization |
Theoretical Background
How does the soil moisture sensor work?
The capacitive sensor outputs an analog voltage that decreases as moisture increases. Dry soil → high value (~1023 in air, ~600+ in dry soil). Wet soil → low value (~300). Its electrodes are covered, so unlike resistive sensors it does not corrode over time.
The relay module
A relay is an electrically operated switch. A tiny 5 V signal from Arduino controls a separate pump circuit that would be too powerful for an Arduino pin. Many relay boards are active-LOW: input LOW → switch closes → pump ON; input HIGH → pump OFF. Always check your module!
Compare the relay switch count with and without hysteresis — fewer switches means less wear on relay and pump.
Exercise 1 — Data Acquisition & Visualization
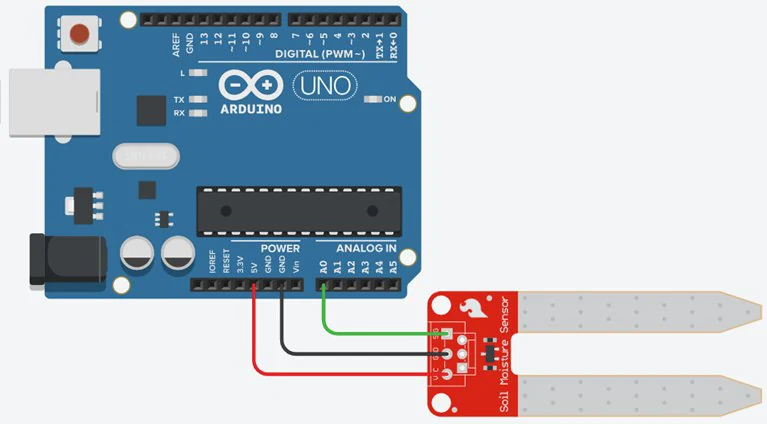
| Sensor pin | Connects to |
|---|---|
| VCC | 3.3V or 5V |
| GND | GND |
| AOUT | Arduino A0 |
const int sensorPin = A0;

void setup() {
  Serial.begin(9600);
}

void loop() {
  int moisture = analogRead(sensorPin);   // ~300 (wet) … ~1023 (dry)
  Serial.println(moisture);
  delay(300);
}import processing.serial.*;
Serial myPort;
int moisture = 0;
void setup() {
size(400, 200);
myPort = new Serial(this, Serial.list()[0], 9600);
myPort.bufferUntil('\n');
}
void draw() {
background(255);
fill(0);
textSize(20);
text("Soil Moisture: " + moisture, 50, 60);
fill(0, 100, 255); // full bar = wet
float w = map(moisture, 1023, 300, 0, 300); // reversed range: low value = wet
rect(50, 100, constrain(w, 0, 300), 30); // adjust 300/1023 after calibration
}
void serialEvent(Serial p) {
String val = p.readStringUntil('\n');
if (val != null) {
val = trim(val);
if (val.matches("\\d+")) moisture = int(val);
}
}Exercise 2 — Control the Water Pump from Processing
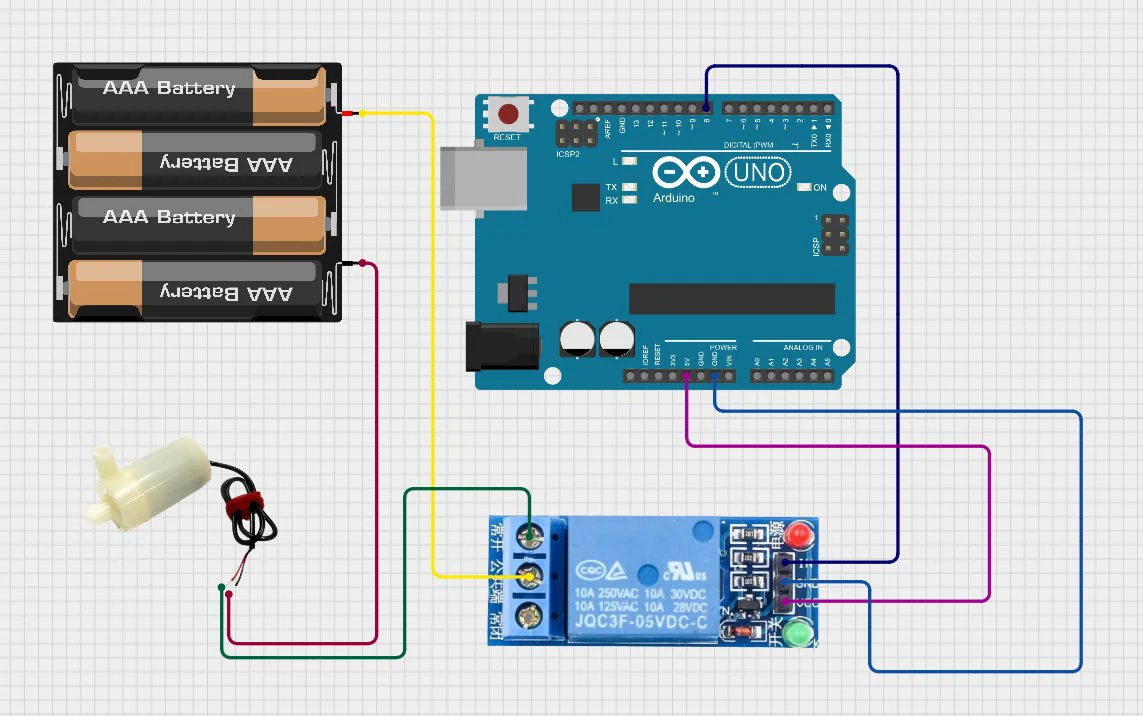
| Connection | Description |
|---|---|
| Relay IN | Arduino D8 |
| Relay VCC | Arduino 5V |
| Relay GND | Arduino GND |
| Relay COM | + terminal of external power supply |
| Relay NO | Pump (+) terminal |
| Pump (−) terminal | Power supply GND |
const int RELAY_PIN = 8;
const int PUMP_ON  = LOW;    // active-LOW relay module
const int PUMP_OFF = HIGH;   // swap these if your module is active-HIGH

void setup() {
  Serial.begin(9600);
  pinMode(RELAY_PIN, OUTPUT);
  digitalWrite(RELAY_PIN, PUMP_OFF);   // make sure the pump starts OFF
}

void loop() {
  if (Serial.available() > 0) {
    char cmd = Serial.read();
    if (cmd == '1')      digitalWrite(RELAY_PIN, PUMP_ON);
    else if (cmd == '0') digitalWrite(RELAY_PIN, PUMP_OFF);
    // any other character (e.g. newline) is ignored
  }
}import processing.serial.*;
Serial myPort;
void setup() {
size(360, 100);
myPort = new Serial(this, Serial.list()[0], 9600);
}
void draw() {
background(200);
fill(0);
text("Press '1' to turn ON pump, '0' to turn OFF", 20, 50);
}
void keyPressed() {
if (key == '1' || key == '0') myPort.write(key);
}Exercise 3 — Full Automatic Irrigation System
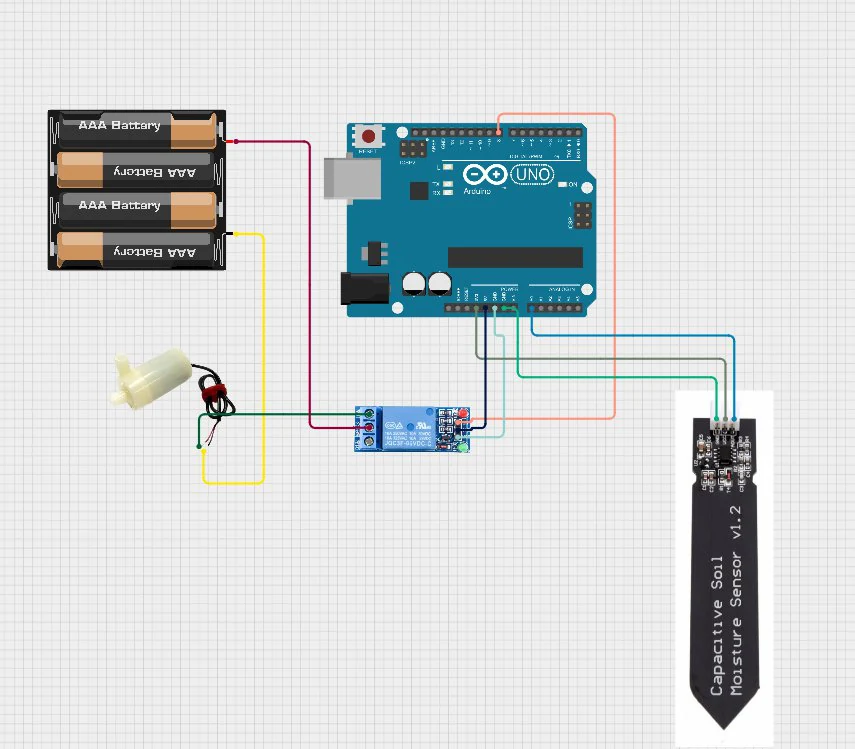
#define RELAY_PIN  8
#define SENSOR_PIN A0
#define THRESHOLD  600       // above = too dry

const int PUMP_ON  = LOW;    // active-LOW relay
const int PUMP_OFF = HIGH;

void setup() {
  Serial.begin(9600);
  pinMode(RELAY_PIN, OUTPUT);
  digitalWrite(RELAY_PIN, PUMP_OFF);
}

void loop() {
  int moisture = analogRead(SENSOR_PIN);
  Serial.println(moisture);

  if (moisture > THRESHOLD) digitalWrite(RELAY_PIN, PUMP_ON);   // dry → water
  else                      digitalWrite(RELAY_PIN, PUMP_OFF);  // wet → stop
  delay(1000);
}import processing.serial.*;
Serial myPort;
int moisture = 0;
void setup() {
size(400, 200);
myPort = new Serial(this, Serial.list()[0], 9600);
myPort.bufferUntil('\n');
}
void draw() {
background(255);
fill(0);
textSize(20);
text("Soil Moisture: " + moisture, 50, 100);
if (moisture > 600) {
fill(255, 0, 0);
text("Status: DRY \u2013 Watering", 50, 140);
} else {
fill(0, 150, 0);
text("Status: WET \u2013 Idle", 50, 140);
}
}
void serialEvent(Serial p) {
String val = p.readStringUntil('\n');
if (val != null && trim(val).matches("\\d+")) moisture = int(trim(val));
}Student tasks
Troubleshooting
| Problem | Likely cause | Fix |
|---|---|---|
| Pump does not turn on | Relay wiring incorrect or pin mismatch | Relay IN must match RELAY_PIN (8). Listen for the relay “click”. |
| Pump is ON when it should be OFF | Relay is active-HIGH, not active-LOW | Swap the PUMP_ON / PUMP_OFF constants. |
| Sensor always reads max | Sensor not in soil or damaged | Insert up to the line; never submerge the electronics. |
| Pump runs continuously | Threshold too low for your soil | Calibrate: measure dry and wet values and choose a threshold between them. |
| Relay clicks on/off rapidly | Value hovers around the threshold | Add hysteresis (exercise P5.4). |
| Processing shows no data | Wrong COM port or baud rate | printArray(Serial.list()) and use 9600 on both sides. |
Exercises
Calibrate to percent
Your sensor reads 820 in dry soil and 340 in freshly watered soil. Convert a reading of 580 into a moisture percentage (0 % = dry, 100 % = wet). Write the Processing map() call.
float pct = constrain(map(moisture, 820, 340, 0, 100), 0, 100);Why a relay?
An Arduino pin can supply about 20 mA at 5 V. A small pump needs about 200 mA. Explain why we can’t connect the pump directly to a pin, and what the relay does instead.
Manual override button
Add an on-screen WATER NOW button to the Processing dashboard that sends 1 while held and 0 when released. Show the pump state with an icon or colour.
mousePressed() and mouseReleased(); check the mouse is inside the button rectangle.boolean pumping = false;
// in draw():
fill(pumping ? color(61, 155, 255) : color(180));
rect(50, 160, 140, 30, 6);
fill(255);
text("WATER NOW", 65, 182);
void mousePressed() {
if (mouseX > 50 && mouseX < 190 && mouseY > 160 && mouseY < 190) {
myPort.write('1');
pumping = true;
}
}
void mouseReleased() {
if (pumping) {
myPort.write('0');
pumping = false;
}
}Add hysteresis
With a single threshold the relay can click on and off every second when the value hovers around 600. Change the Arduino code so the pump turns ON above 650 and only turns OFF below 450. Explain why this is better for the pump and the plant.
const int DRY_ON  = 650;
const int WET_OFF = 450;
bool pumpOn = false;

void loop() {
  int moisture = analogRead(SENSOR_PIN);
  Serial.println(moisture);

  if (!pumpOn && moisture > DRY_ON)  pumpOn = true;
  if (pumpOn  && moisture < WET_OFF) pumpOn = false;

  digitalWrite(RELAY_PIN, pumpOn ? PUMP_ON : PUMP_OFF);
  delay(1000);
}The thirsty pump
A team’s pump runs all the time, even in wet soil, and stops only when the soil is dry. Their code is the original Exercise 3 with HIGH = water ON. What is wrong, and how do you prove it with a single test?
HIGH actually switches the pump OFF and LOW switches it ON — the logic is inverted. Test: upload a sketch that only does digitalWrite(8, HIGH) and listen/look: if the pump is off, the module is active-LOW. Fix by swapping the constants.Water-saving study
Run two identical plants for one week: one watered by hand daily, one by your automatic system. Measure the water used (fill the reservoir to a mark, measure refills) and log moisture. Present which method uses less water and keeps moisture more stable.
- 01Define fair-test conditions (same plant, pot, soil, location).
- 02Log moisture every 10 minutes to CSV.
- 03Record water volume used per day.
- 04Present a chart and a conclusion with numbers.
Self-check quiz
- Q01
As soil gets wetter, the capacitive sensor’s value…
- Q02
What is the main job of the relay?
- Q03
An active-LOW relay module turns ON when its input is…
- Q04
What problem does hysteresis solve?
- Q05
Which is the safest power choice for the pump in a classroom?
Real world & extensions
- +OLED display showing moisture on the device (I²C)
- +Send data over WiFi with ESP8266 / ESP32
- +Web dashboard to monitor soil moisture remotely
- +Cloud logging (ThingSpeak, Blynk)
- +Multi-zone irrigation for several plants
- +Real-time moisture graph in Processing
- +Weather API: skip watering when rain is forecast
- +Battery + solar panel for an off-grid system
| Subject | Connection |
|---|---|
| Physics | Capacitance, analog voltage, circuits, relay switching |
| Biology & Ecology | Plant biology, soil composition, the water cycle |
| Computer Science | Control loops, state, serial communication |
| Technology & Engineering | Sensor integration, actuator control |
| Mathematics | Scaling, thresholds, interpreting graphs |
| Environmental Science | Water conservation, sustainable agriculture, climate |
Reflection & conclusion
Your system is a “closed loop”. Find two other closed-loop systems in everyday life.
What could go wrong if the sensor fails while the pump is ON? How could you design a safety timeout?
How could automatic irrigation help farmers in regions affected by drought?
You built a practical automatic system that senses, decides and acts. Combining a soil moisture sensor, a relay and Processing, you gained hands-on experience in electronics, programming and environmental monitoring — the same principles behind smart greenhouses and precision agriculture that help conserve water worldwide.